Support
Get-started
Set up an existing ipad
Set up a new ipad
Assign sensors
Calibrate sensors
Fitting sensors
Troubleshooting
If you need additional assistance, please contact Etiscope Support.

Get-started
Set up an existing ipad
Set up a new ipad
Assign sensors
Calibrate sensors
Fitting sensors
Troubleshooting
If you need additional assistance, please contact Etiscope Support.
Thank you for making Etiscope part of your safety program. We are proud to support this step to improving the wellbeing, safety and performance of staff by reducing WMSD in your workplace.
Your kit has been assembled by our Melbourne based team - please take the time to check that all items listed below are included.
Your sensors should be fully charged and calibrated so that you are ready to get started.
1 x Weatherproof Carry Case
5 x Wearable Sensors
2 x Silicone sensor housing clip
1 x 5 Port micro USB Charger
1 x USB Charger power cable
5 x USB connector cables
2 x Arm Bands
1 x Neck Strap (Medium)
1 x Neck Strap (Large)
1 x Waist strap
1 x Waist extension strap
Click here to get started if you are using your own iPad or iPhone
Click here to get started if you are using a new Etiscope supplied iPad or iPhone.
*Please note you will need to load the Etiscope App with your own Apple ID to ensure security of your data.
Before starting the setup procedure, please check that your current iPad/iPhone meets the minimum specifications. Check minimum specifications here.
Check that your iOS is current in the iOS ‘Settings/General’ tab on your device by selecting ‘Software Update’. If the software is not yet up to date, please update it.
Ensure that your iPad is logged into your unique Apple ID.
Go the Apple Store (AppStore) and search for ‘Etiscope’. It is free and has no in app purchases.
Download the Etiscope App. This requires internet access.
Open the App and log in using the login details provided by Etiscope.
If you do not have a password, simply select ‘Reset Password’ to receive an email link to set up or reset your password.
Once you have logged into the App you no longer need internet access to use the App for task assessments, but you do need it to upload the assessment data to the cloud service for backup and use in the portal.
The next step is to ’Assign sensors’ and then you are on your way.
To assign the sensors you must have Bluetooth enabled.
If you have an Etiscope supplied iPad or iPhone, then the iPad or iPhone may have already been partially setup by Etiscope. This means that it meets that it minimum specifications, and the iOS has been updated to the latest version.
However, there are a few things for you to do. If you have already supplied us with your Apple ID (to preload the App and configure the sensors), than you can jump straight to the ‘Create Work Task’ documents and video.
If we used our Apple ID to load the App and test the system, then you need to go through the following steps:
Check the iPad is logged into your unique Apple ID in the Setting tab on your device.
Go the Apple Store (AppStore) and search for ‘Etiscope’. It is free and has no in app purchases
Download the Etiscope App. This requires internet access.
Open the App and log in using the login details provided by Etiscope. If you do not have a password, simply select ‘Reset Password’ to receive an email link to set up or reset your password.
Once you have logged into the App you no longer need internet access to use the App for task assessments but you do need it to upload the assessment data to the cloud service for backup and use in the portal.
The next step is to ’Assign sensors’ and then you are on your way.
To assign the sensors you must have Bluetooth enabled.
To begin the process of assigning sensors, please ensure you have internet access and bluetooth connectivity enabled on your iPad or iPhone, and that your sensors are placed next to your iPad or iPhone.
Open the Etiscope app and login to your account with your User ID email address and password. If you do not know your password you can reset your password with the ‘reset password’ link.
Once the app is open, select the ‘Sensors’ tab at the bottom of the screen.
Then click the orange settings icon at the top right corner of the screen and select ‘Assign sensor locations’.
The app will now locate the nearest Etiscope sensors.
The sensors will display a blue light once they connect to the Etiscope app.
Once the app has identified 5 sensors, press ‘Continue’.
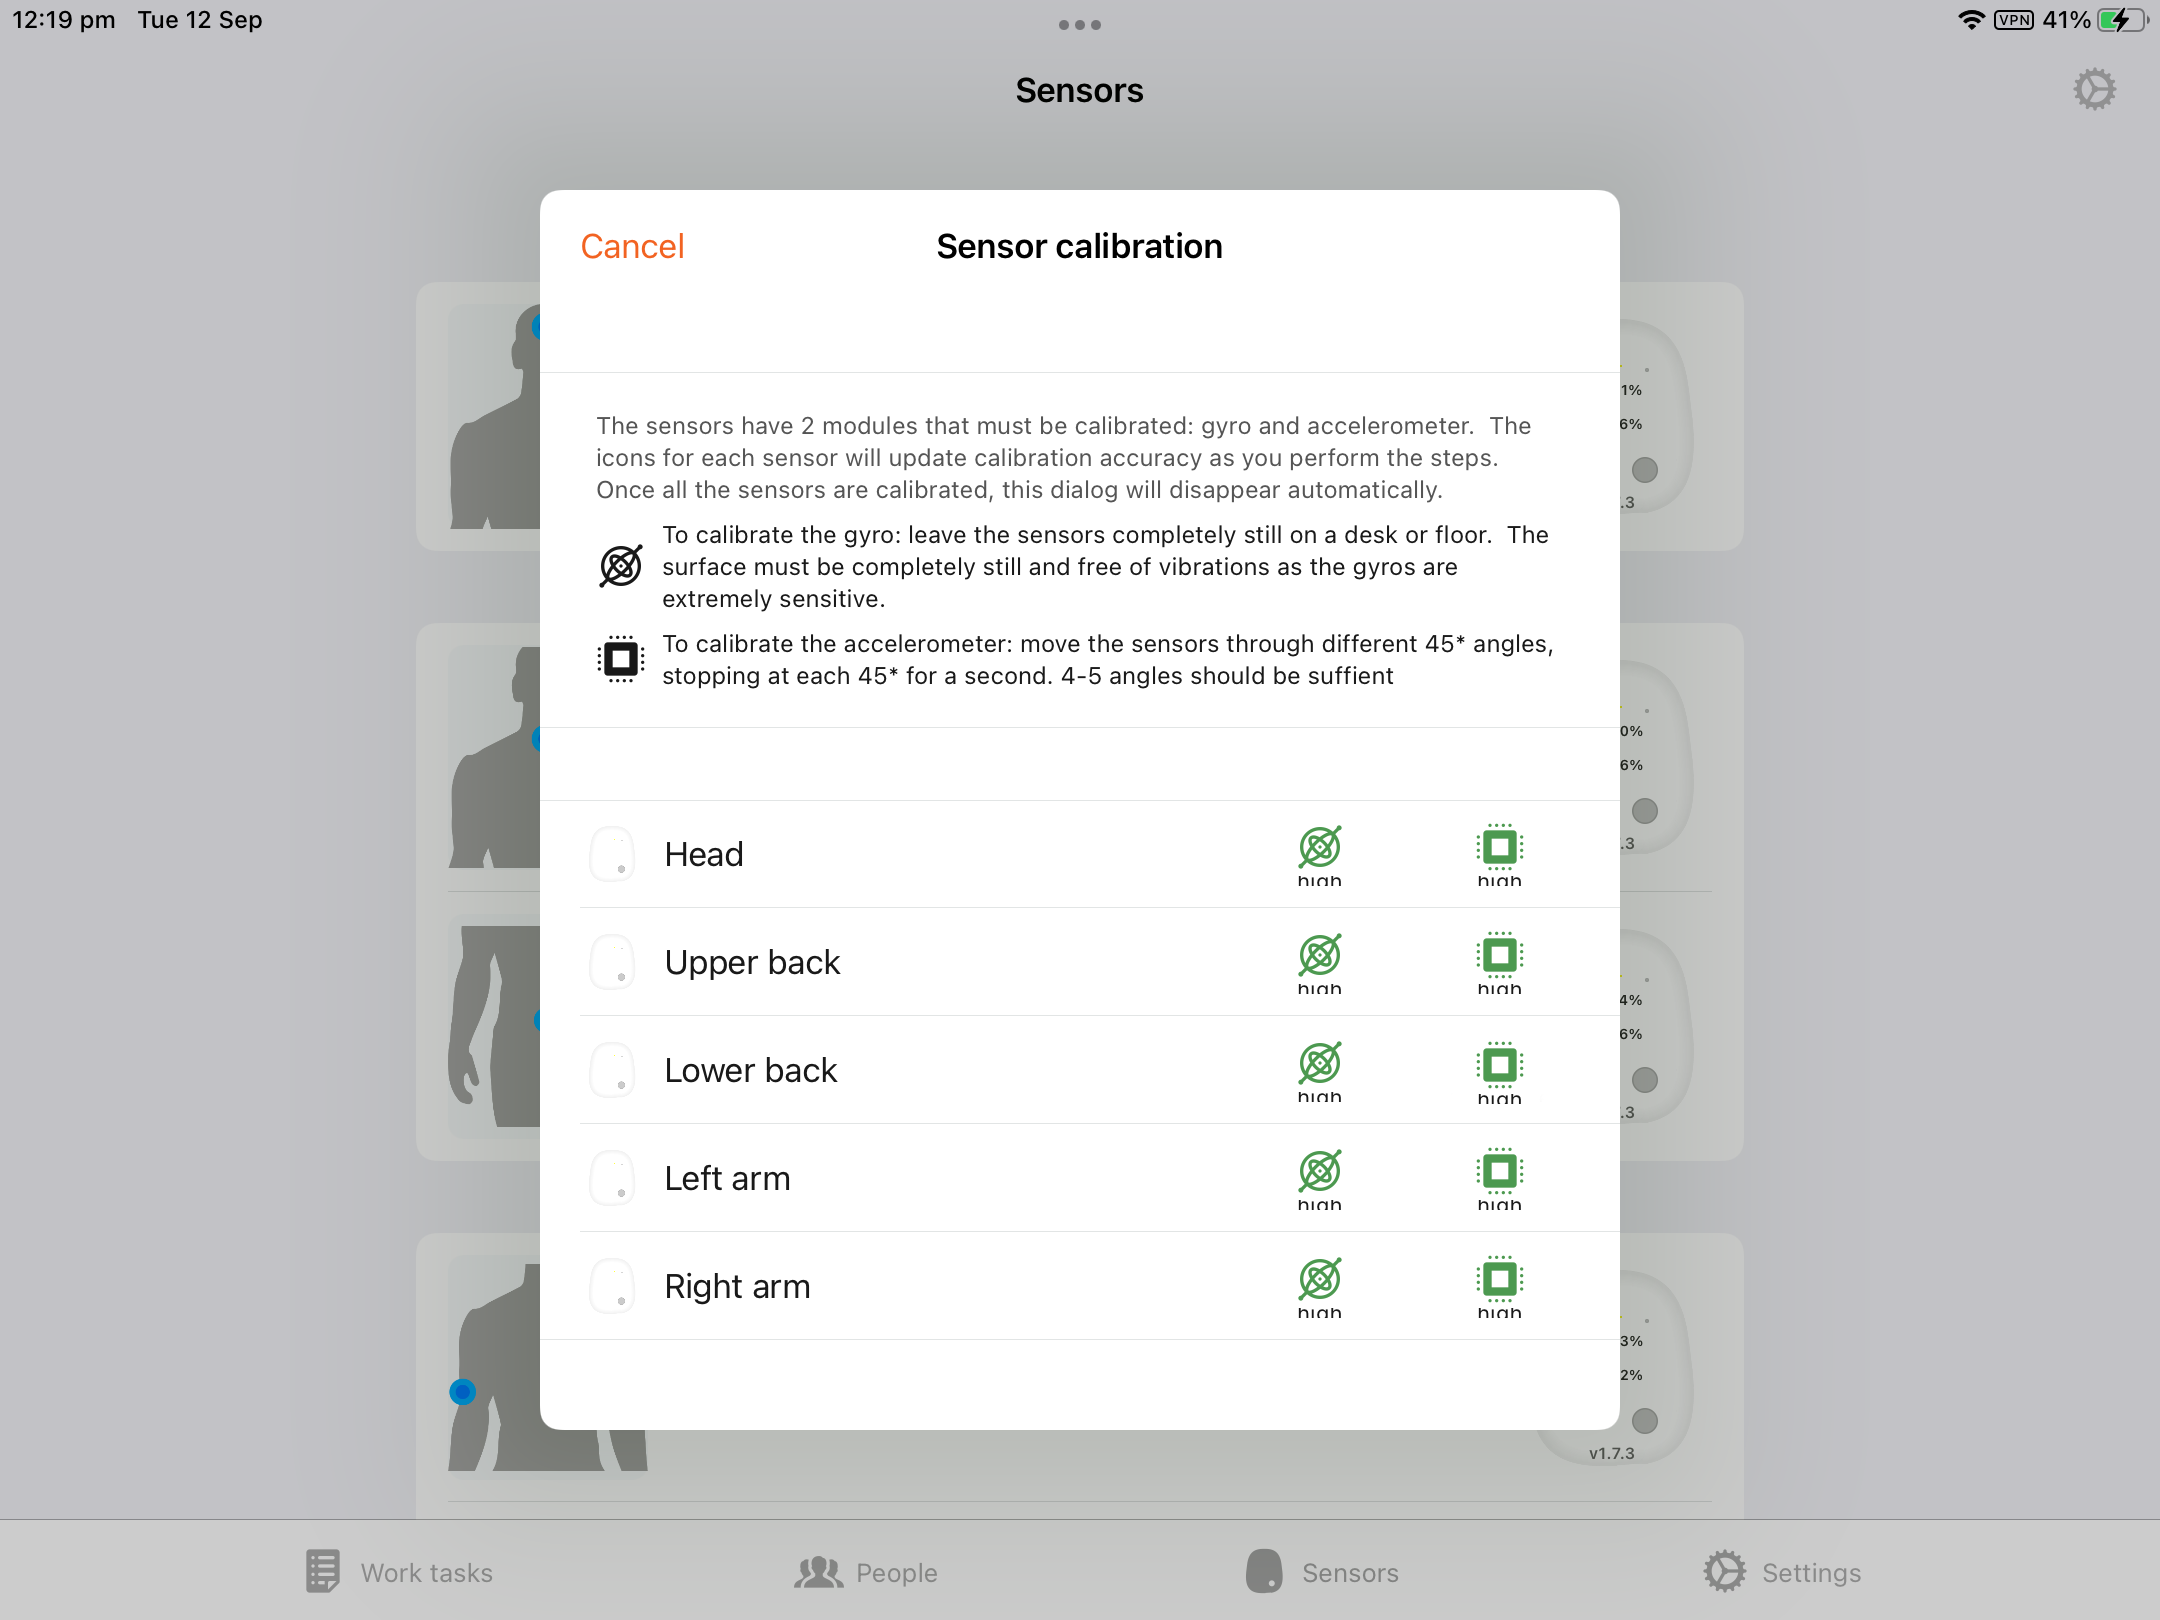
It is now time to assign the sensors to the correct body region.
Each of your sensors will have a label on – press the grey button on the correct sensor to match with the app. There are five body regions - Head, Upper Back, Lower Back, and Left and Right arm.
Repeat the process, until each sensor has been assigned to a body region.
The sensors will display a green light once they have been assigned.
To begin the process of assigning sensors, please ensure you have internet access and bluetooth connectivity enabled on your iPad or iPhone, and that your sensors are placed next to your iPad or iPhone.
Begin the calibration process by going to the orange settings icon in the top right of the corner of the screen and select ‘Calibrate sensors’.
Place the sensors on a flat surface for several seconds until the app calibrates each of the gyros.
The gyro button will turn green once the process is complete.
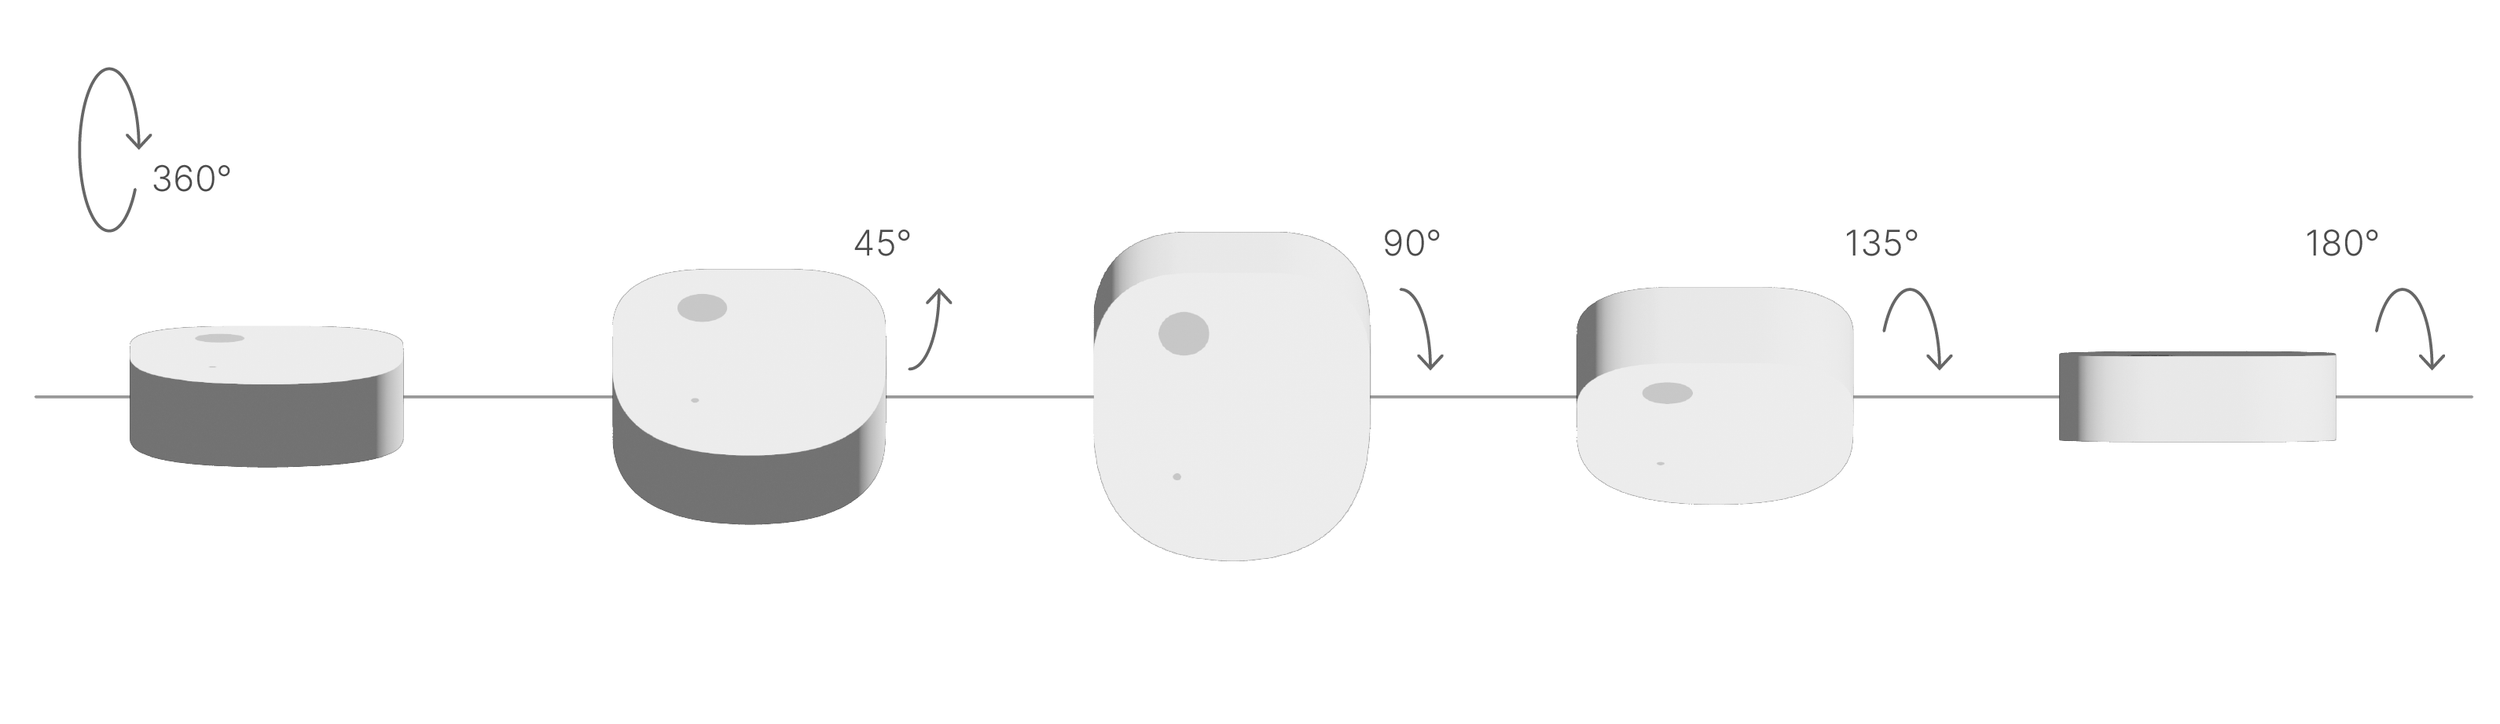
Slowly rotate each sensor sideways around the X axis in 45-degree increments, pausing at each 45 degree angle for 3 seconds.
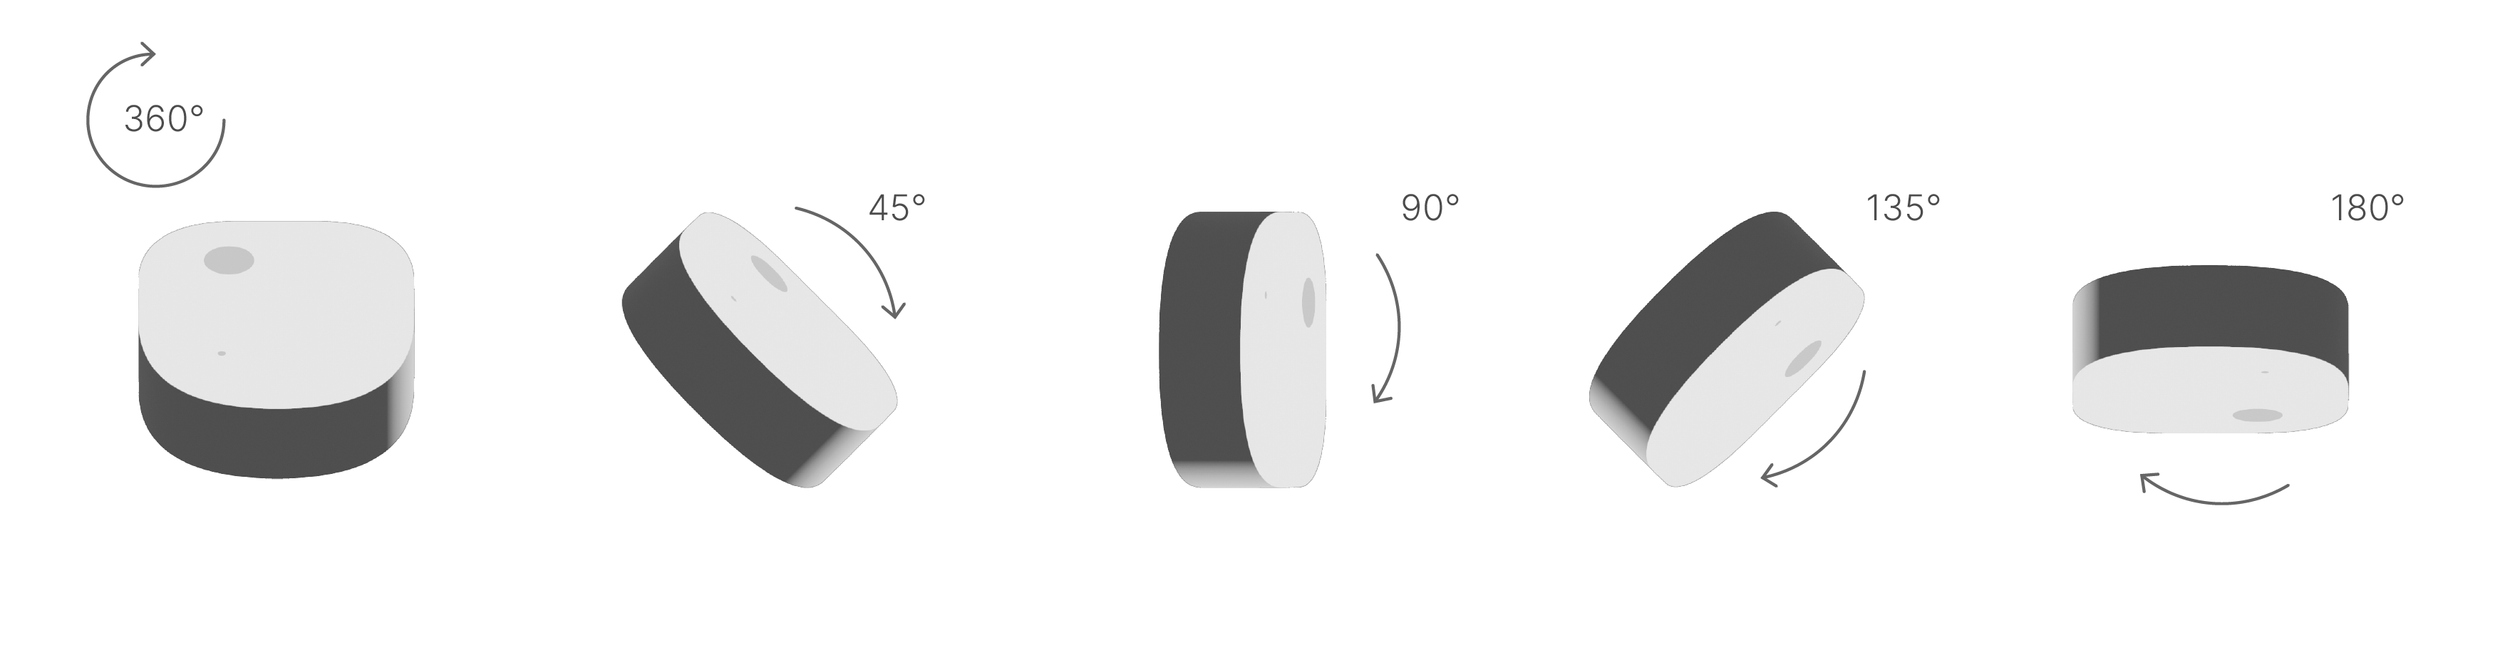
Slowly rotate each sensor forwards around the X axis in 45-degree increments, pausing at each 45 degree angle for 3 seconds.
Repeat the calibration process until all sensors are calibrated and the accelerometer check buttons have all turned green.
Once the calibration is complete, the app will automatically take you back to the sensor home page.
The sensors are now ready for use.
Before fitting the five sensors, please ensure you have the following items;
5 x Wearable sensors
1 x Silicone sensor housings clips
2 x Velcro Elbow Bands
1 x Elastic Head strap
2 x Velcro Neck Straps (Medium and Large - please select correct sized neck strap)
1 x Velcro/Elastic Waist strap (and extender)
We recommend using our tested Etiscope straps for your assessments, however we have included an alternative option for the neck and waist that can be used if needed. If using an alternative method please ensure that the sensors are not attached to any loose fitting clothing. The sensors should be secured in their assigned holders or straps with the blue light visible and positioned at the top.
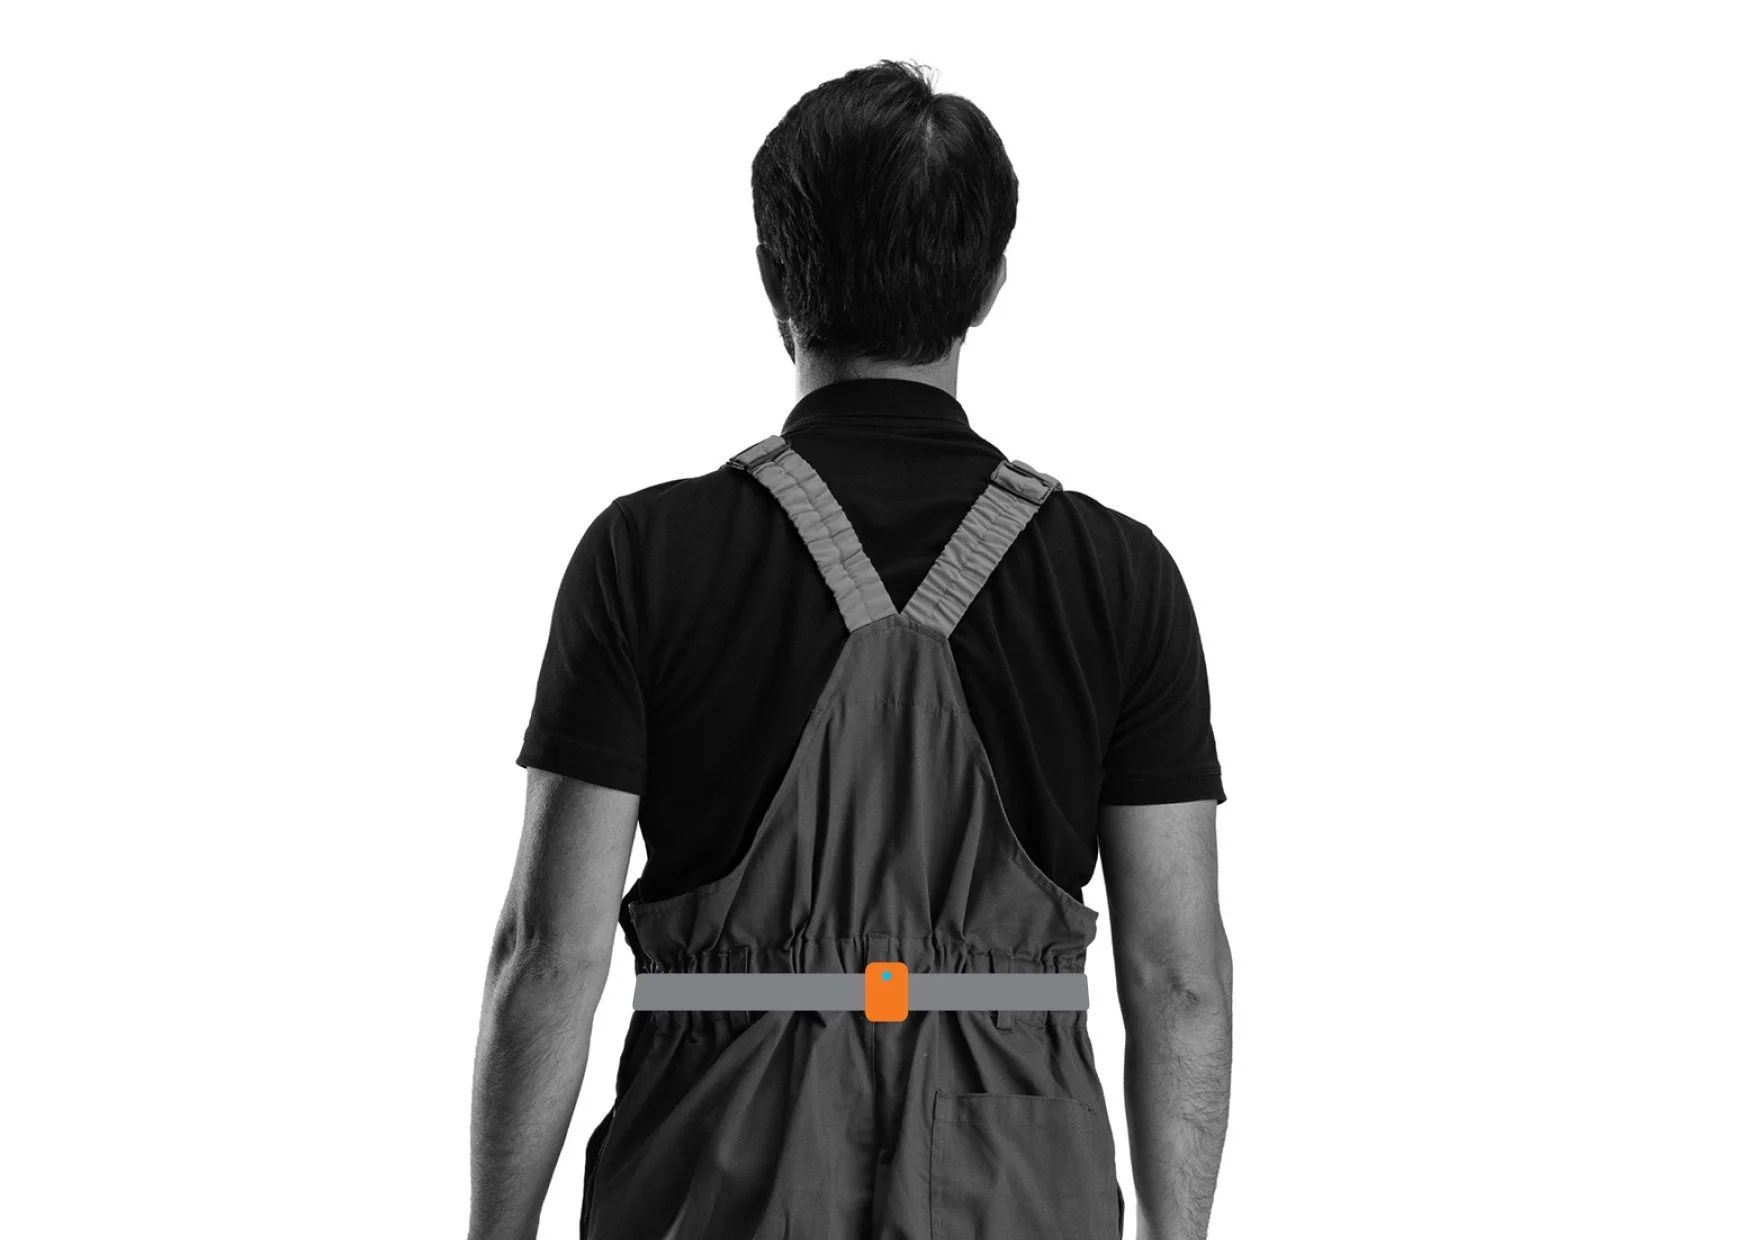
There are two options for attaching the Lower Back Sensor.
Option A (recommended): Insert the Lower Back sensor into the pocket of the velcro/elastic waist strap, and fit the waist strap around your waist.
Option B: Insert the Lower Back sensor into one of the provided clips, and attach the clip to the back of your belt.
*Align the sensor with your spine, so that it sits snuggly against the lower middle section of your back. Alternatively, if you are getting on and off a seat (such as operating a forklift) locate the lower back sensor at the side i.e. at the left or right hip to avoid it being dislodged.
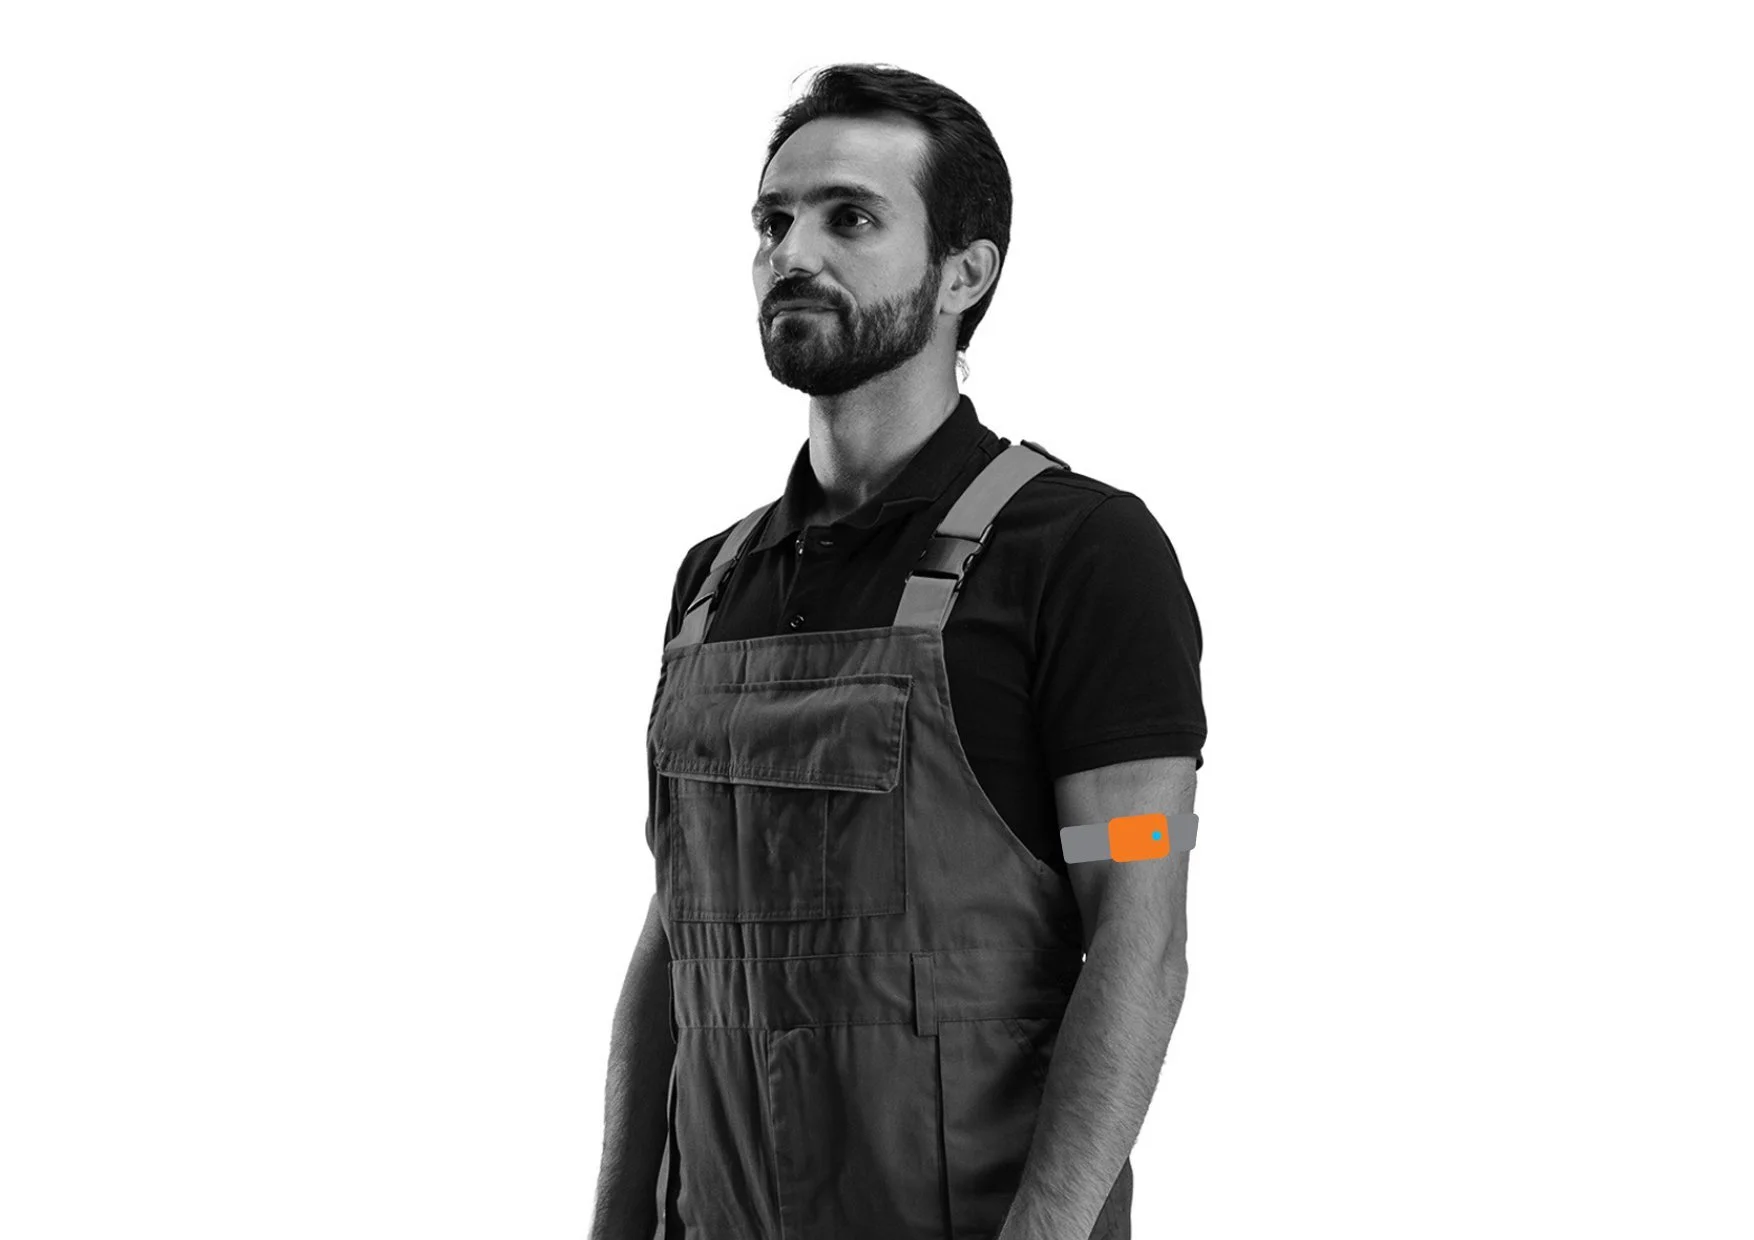
Hold the arm strap with the buckle at the top and insert the Left arm sensor into the pocket of the Arm strap so that the light is at the top, facing towards the buckle.
Tighten the strap just above your elbow. The sensor should be facing away from your body and the sensor light should be facing towards the back of your arm.
Repeat the process with the Right arm sensor.
Insert the Upper Back sensor into the pocket of the velcro Neck strap, and fit the upper back strap around your neck with the pocket placed under your clothing.
*Align the sensor with your spine and so that it sits against the top of your back.

There are two options for attaching the Head Sensor.
Option A (recommended): Attach the Head sensor to the back of the velcro Head strap. Fit the Head strap around your head so that the strap goes across the middle of your forehead and the sensor is facing away from the back of your body.
Option B: Insert the Head sensor into one of the provided clips and attach the clip to the back of your cap or helmet.

Sometimes one or more sensors will lose connection during an assessment, this is no longer an issue as the sensors have now been programmed to continue to log the data regardless of their connection status.
Start your assessment as per normal. The sensors current connection status can be seen whilst capturing the assessment. In portrait mode you'll also see the sensor names.

You may or may not notice one or more of the sensors lose connection. A sensor that has lost its connection will appear to be turned off. As you can see from the screenshot below, three of the sensors have lost connection. You can also see that the graph lines are flattening where no data is being sent from the sensors.
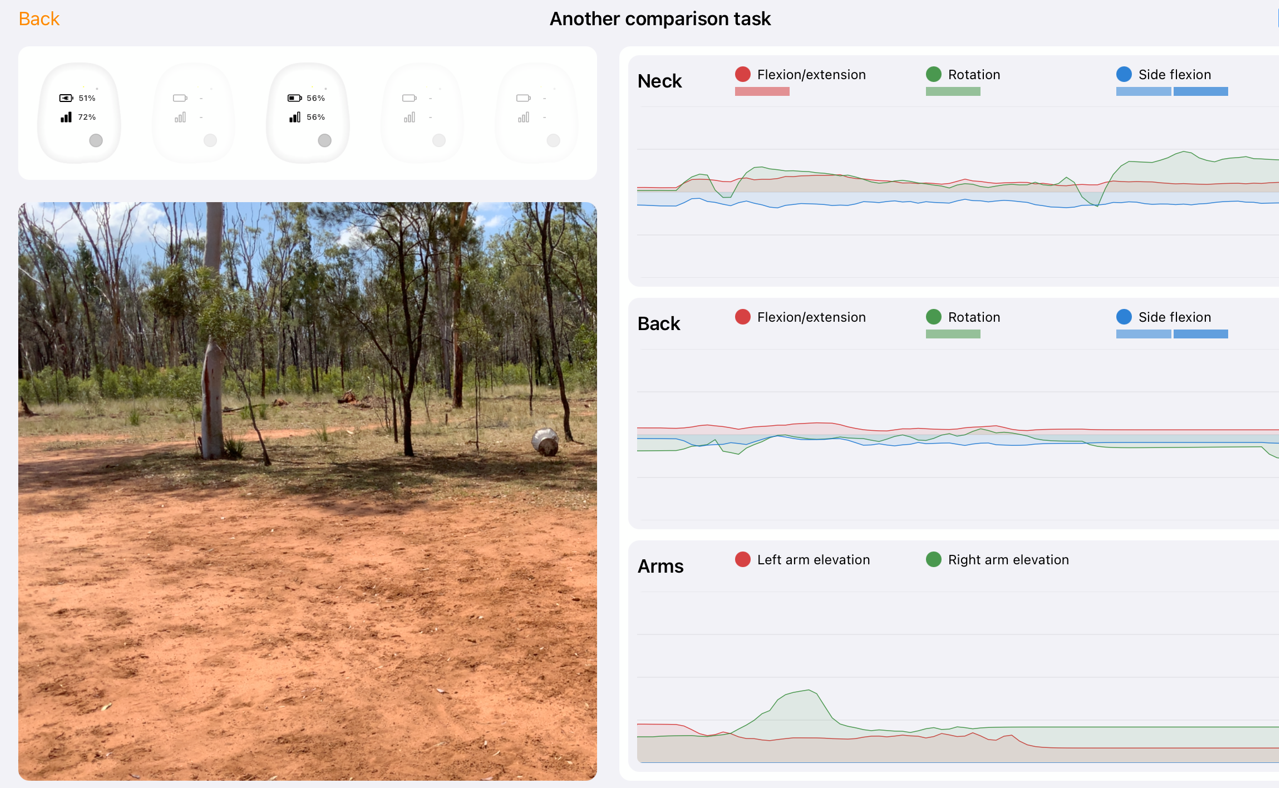
Continue to capture the assessment then click Save, ensuring the sensors have reconnected. You might need to get closer to the user wearing the sensors to reconnect.

The Etiscope app will download all the data from the sensors during the Save process. You can see that the data has been successfully downloaded as the graph no longer has flat lines.
